21 min to read
Python in IoT and Robotics
Backend Solutions for Connected Systems
Python in IoT and Robotics
![]()
Conference Talk Link: https://2025.pyconfhyd.org/speakers/harsh-mittal
Github Link: https://github.com/bytesByHarsh/PyConfHyd2025
Talk Slides: Drive Link
Introduction
Imagine a world where your toaster chats with your coffee machine about the perfect brew temperature, or where a fleet of drones gossip about their battery levels and GPS coordinates as they fly around. Welcome to the realm of IoT and robotics, where devices are not only smart—they’re downright social! In my recent talk, “Python in IoT & Robotics: Scalable Backend Solutions for Connected Systems,” I dove into how Python serves as the central nervous system for orchestrating these connected systems. Here’s a deeper look at the ideas and architectures we explored.
The Need for a Connected Backend
1) Data Silos
Individual robots or IoT devices operate in isolation, generating and storing data locally. This creates data silos, preventing valuable insights from being shared and utilized across the entire system.
2) Communication Issues
Direct device-to-device communication can be unreliable, leading to delays, dropped messages, and inconsistencies. This is especially true in environments with poor network connectivity.
3) Scalability Challenges
Solutions designed for single devices or small deployments often fail to scale to larger systems. Managing a large number of devices becomes increasingly complex and resource-intensive.
4) Multiple Tech Stack
Robots and IoT devices often use diverse hardware and software platforms, leading to a fragmented ecosystem. This makes integration and interoperability difficult.
Possible Solution: A Centralized Brain
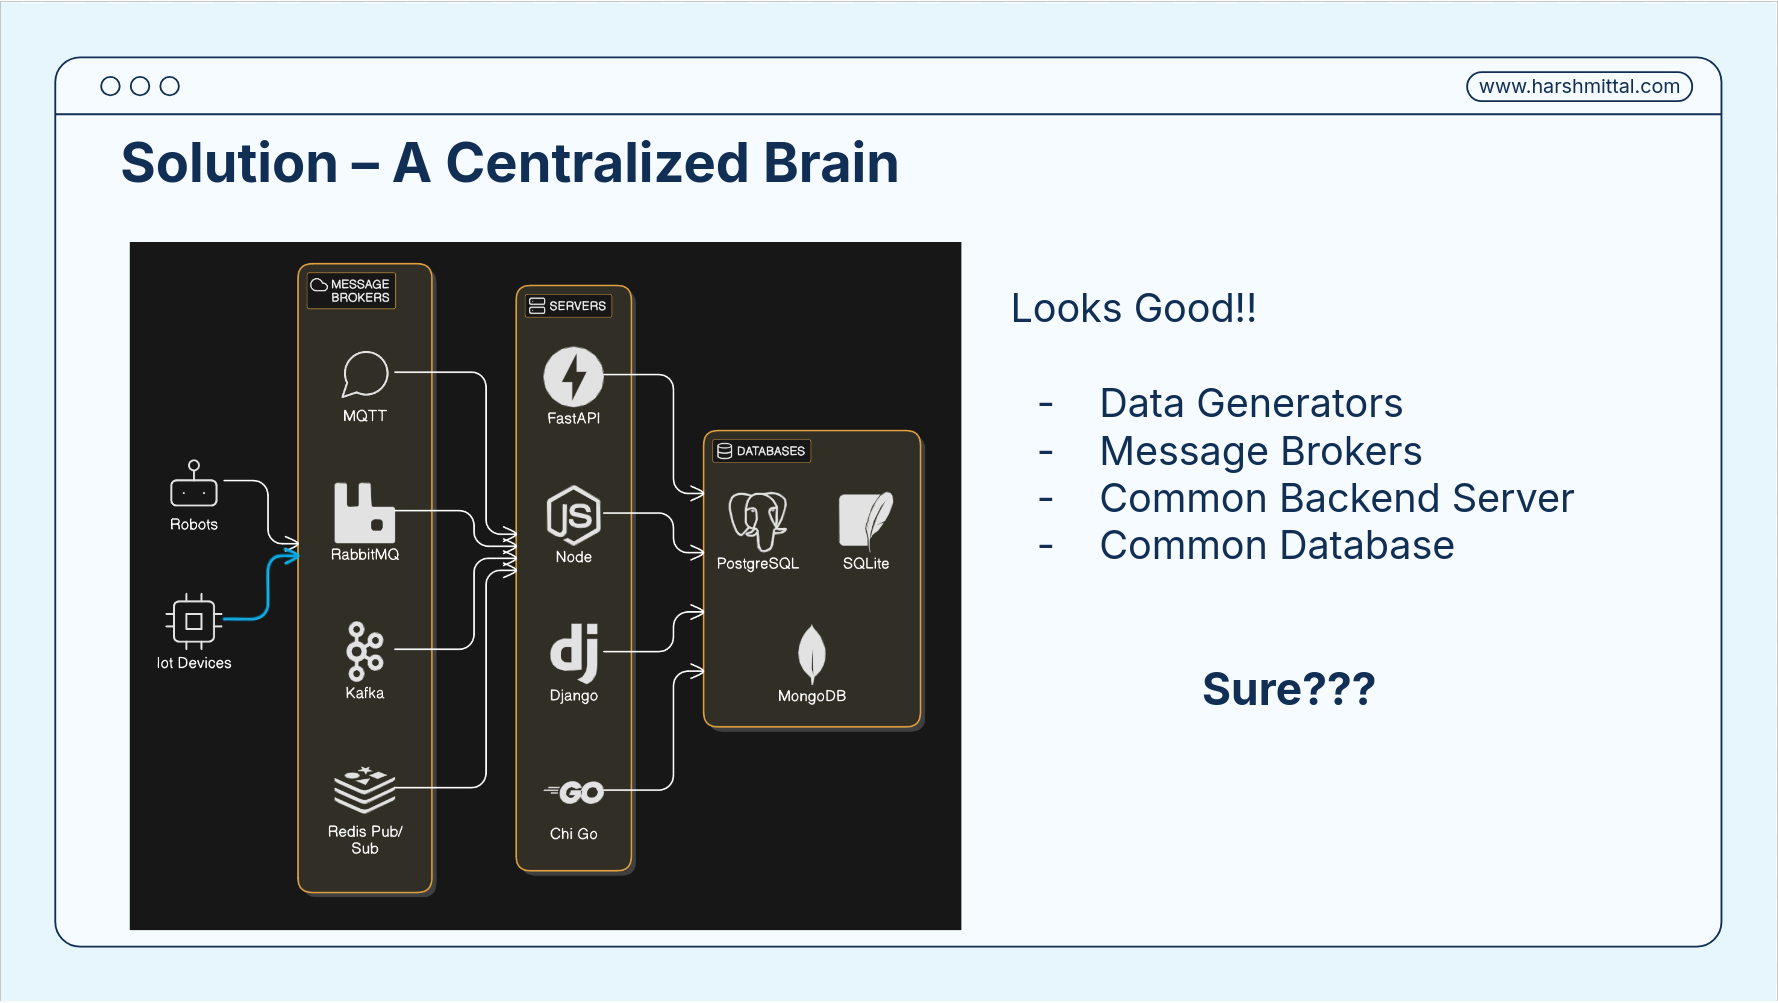
What can go wrong? Let’s understand that:
Challenge 1: High Concurrency & Message Throughput
- Many robots/devices sending data simultaneously.
- Real-time data processing requirements.
- Potential for message storms.
Challenge 2: Network Latency & Reliability
- Varying network conditions (e.g., cellular, Wi-Fi).
- Geographically distributed devices.
- Need for reliable communication in unreliable environments
Challenge 3: Data Management & Storage
- Massive data volumes from sensors and devices.
- Real-time analytics and historical data storage.
- Data security and privacy concerns.
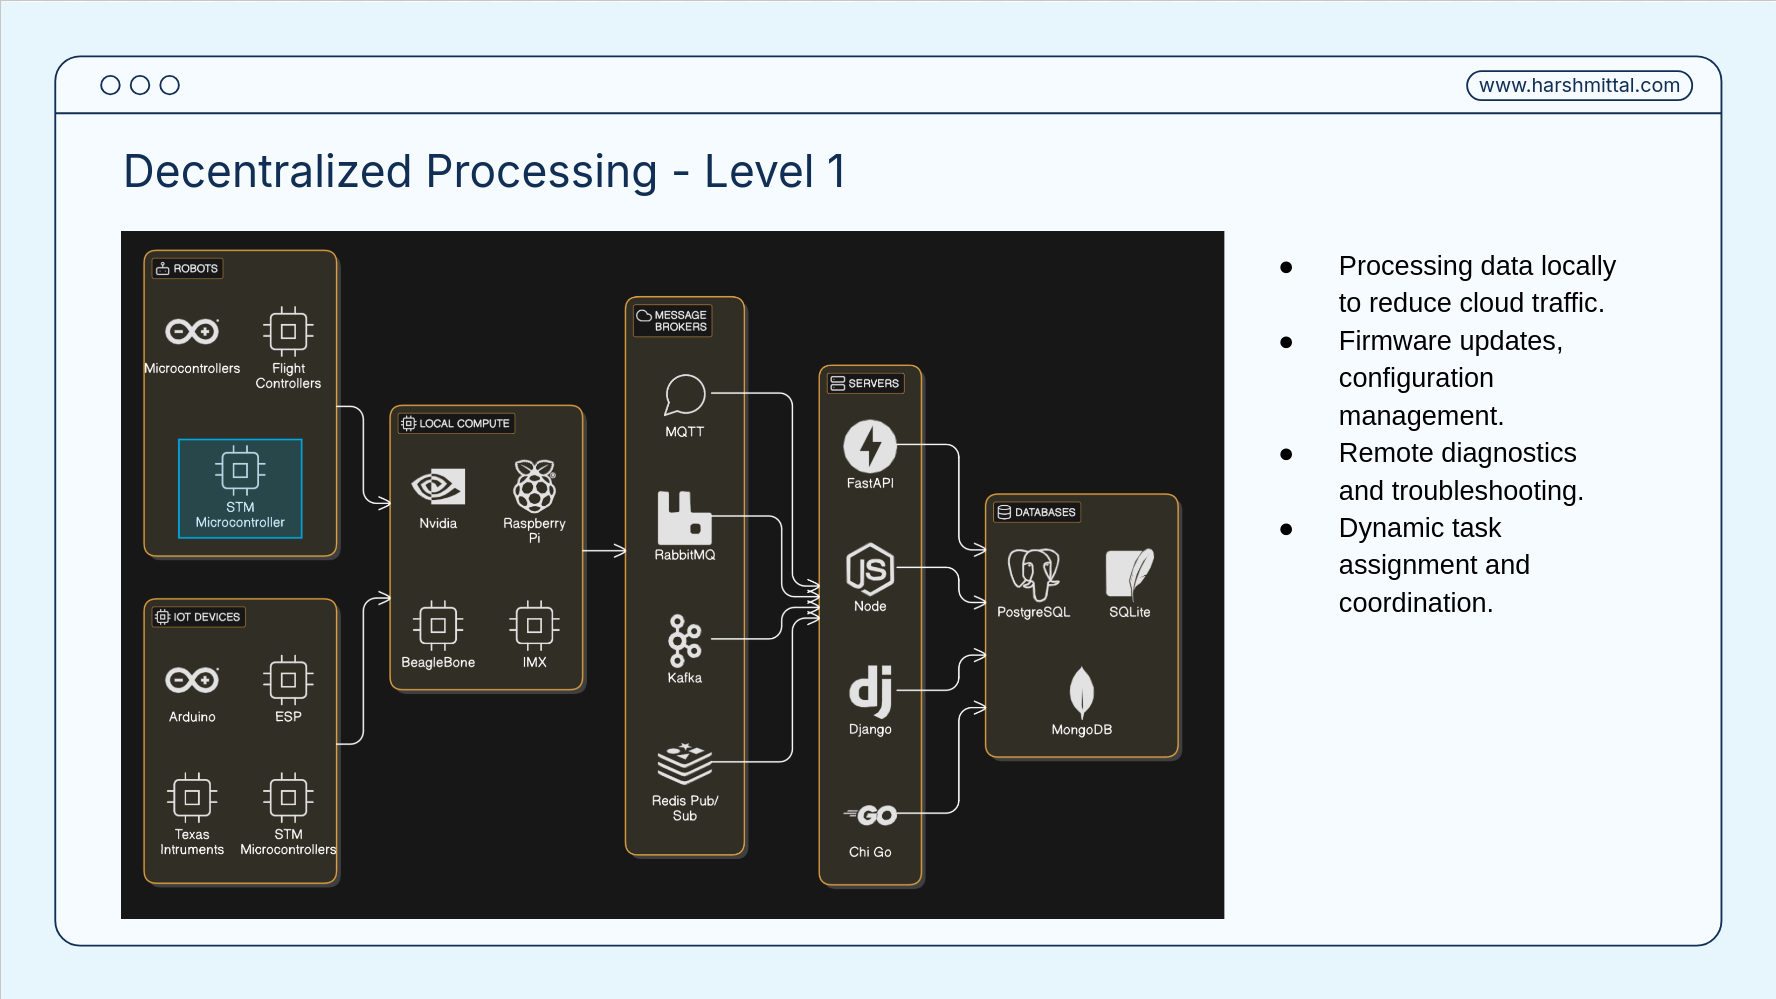
Challenge 4: Device Management & Orchestration
- Firmware updates, configuration management.
- Remote diagnostics and troubleshooting.
- Dynamic task assignment and coordination.
Challenge 5: Edge Computing & Processing
- Processing data locally to reduce cloud traffic.
- Deploying and managing edge applications.
- Resource constraints on edge devices.
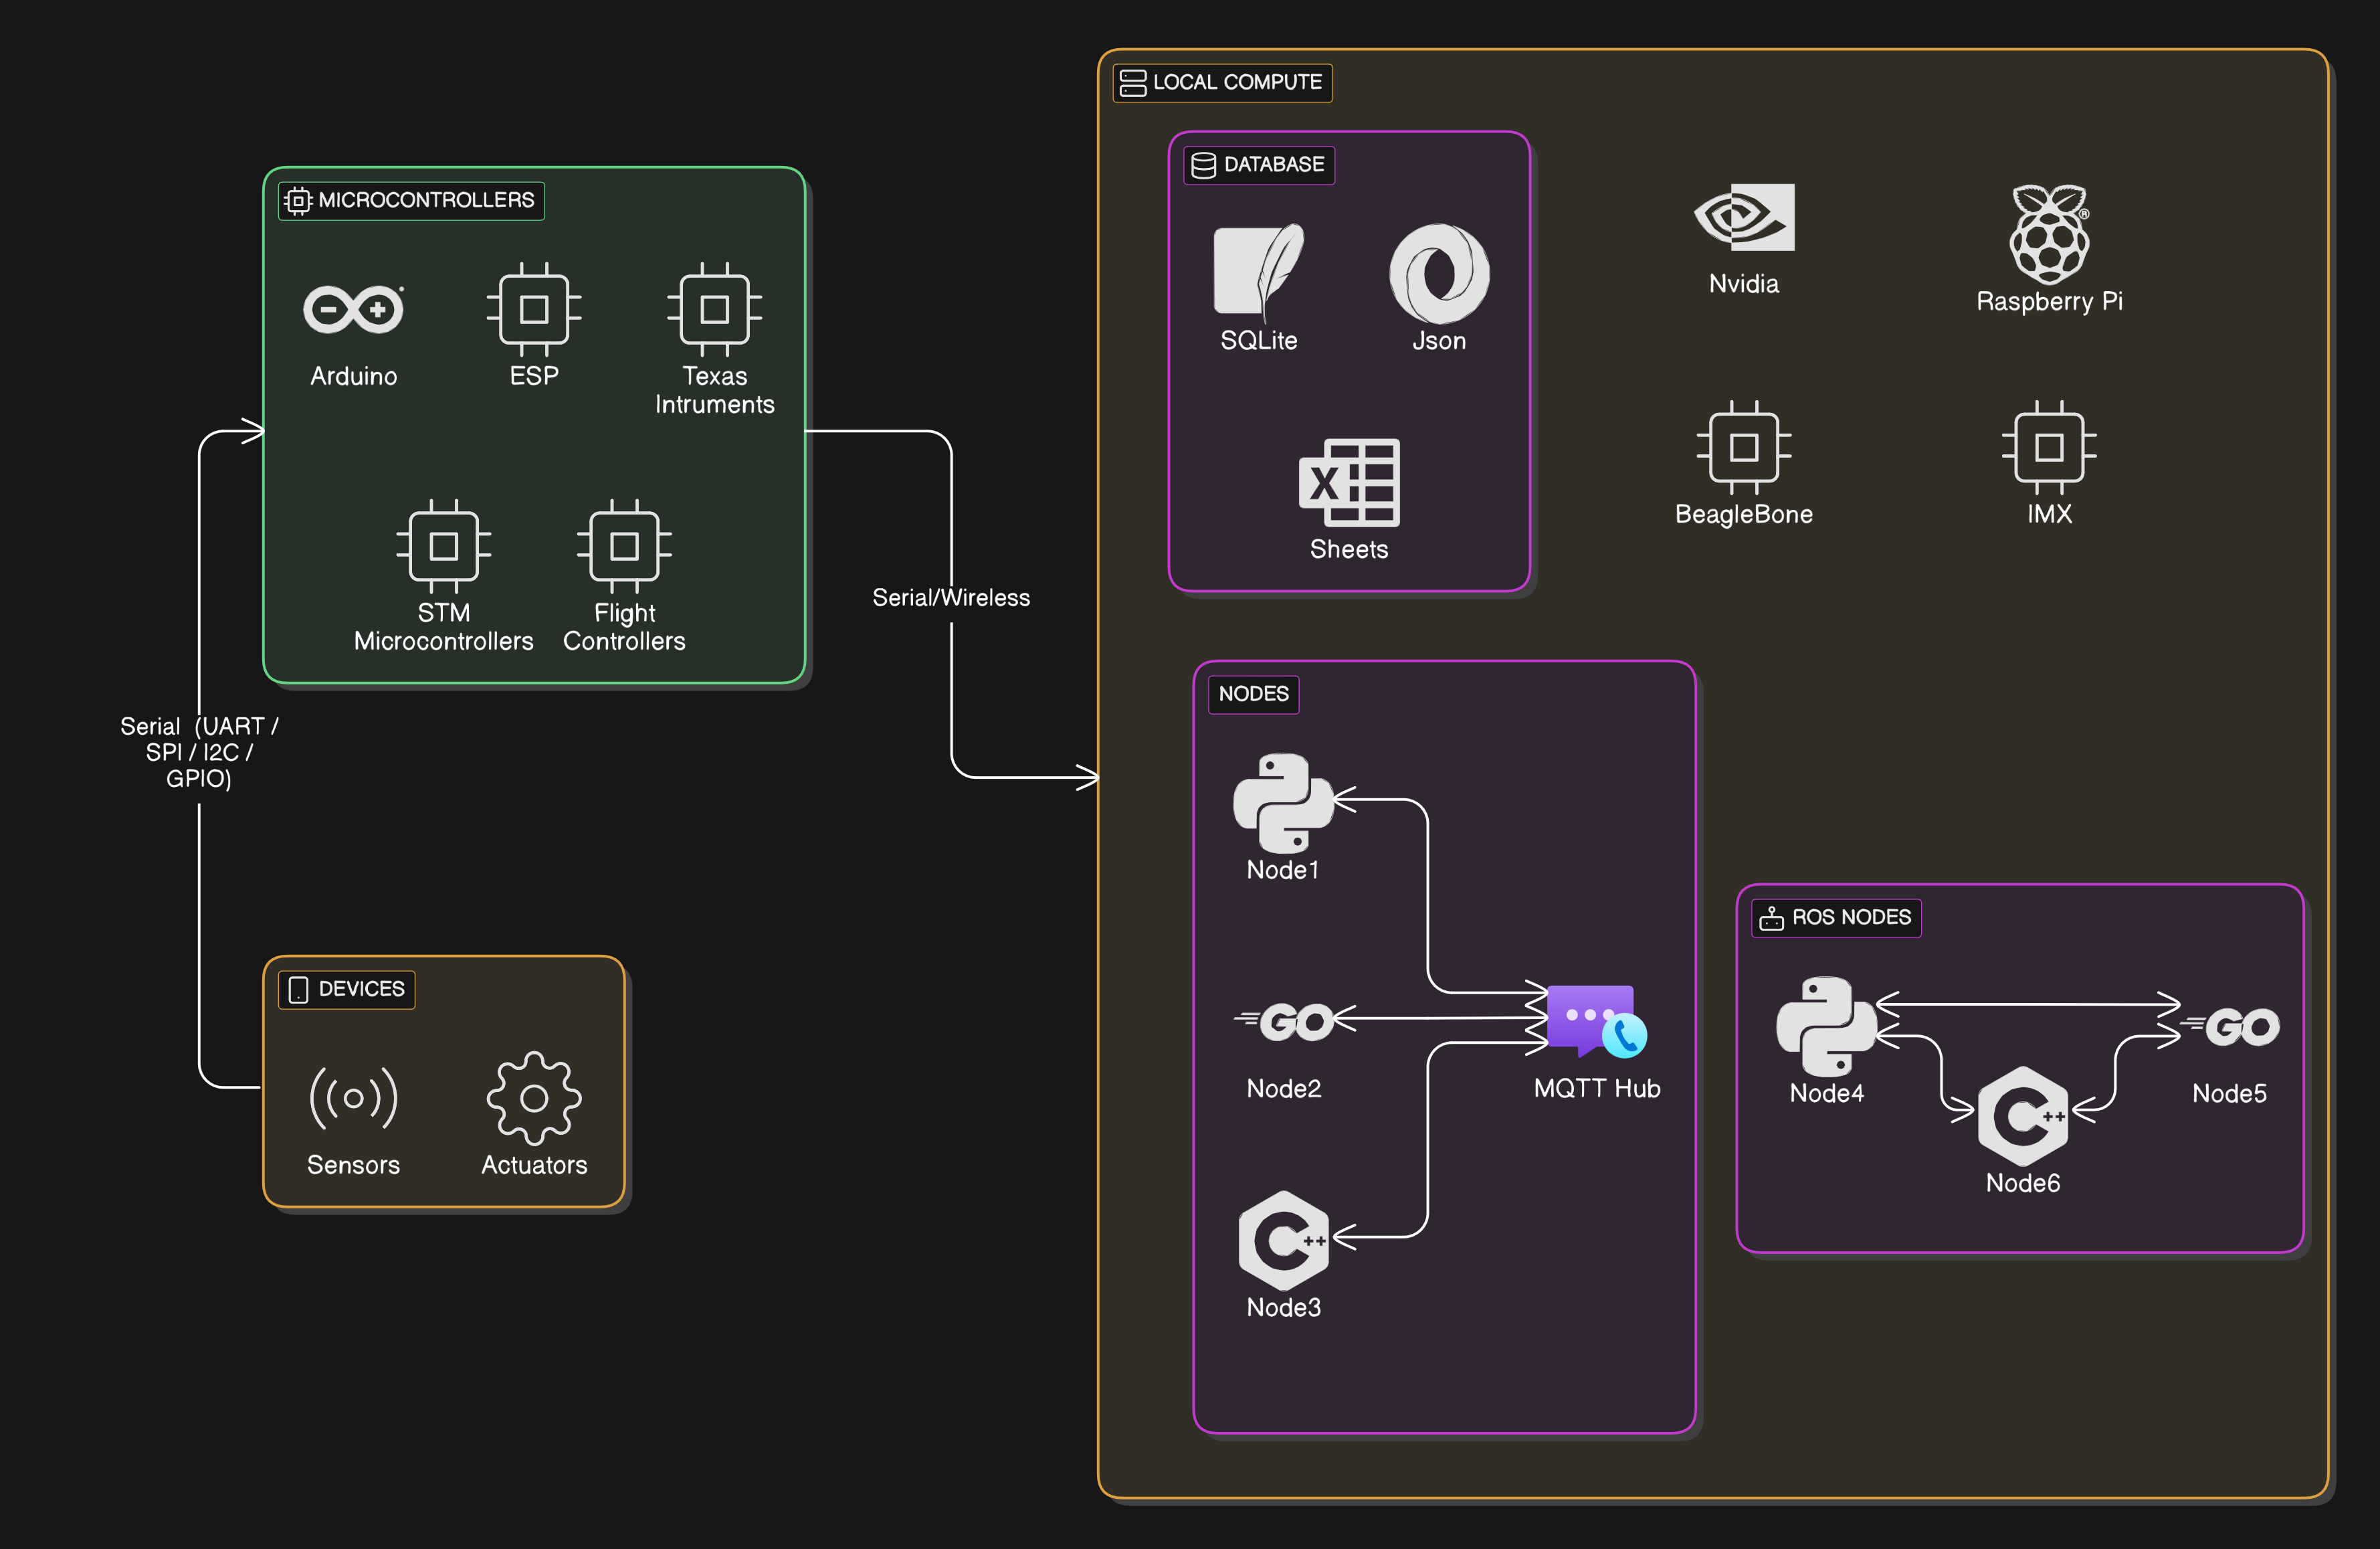
Decentralized Processing
Different Communication Protocols
These are different protocols that will be used for communicating between devices or to the server.
| Wireless | Wired |
|---|---|
| - Wifi - Bluetooth - Zigbee - LPWAN |
- Ethernet - USB - SPI - I2C - RS-232, RS485 - UART |
Local Communication Protocols
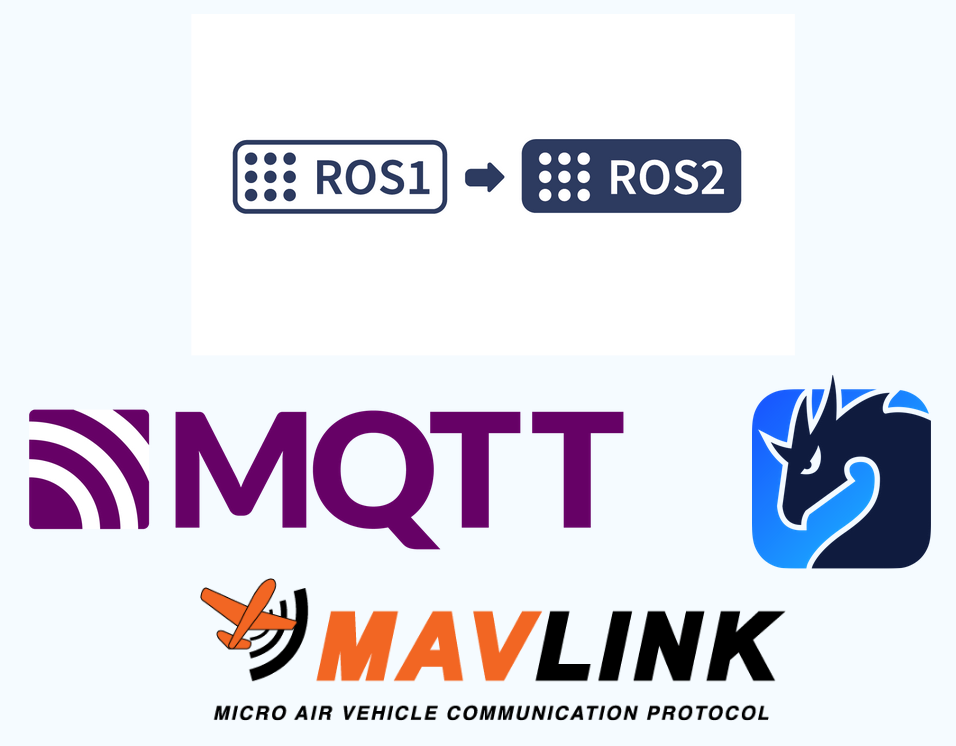
- ROS1 (❌): Officially Not supported, better to upgrade to ROS2
- ROS2: Latest ROS middleware DDS is the default but Zenoh is also a good alternative.
- DDS
- Zenoh
- MQTT
- Mavlink
Considerations for Communication Protocol
- Bandwidth Requirements
- Range
- Power Consumption
- Environment
- Security
- Network Topology
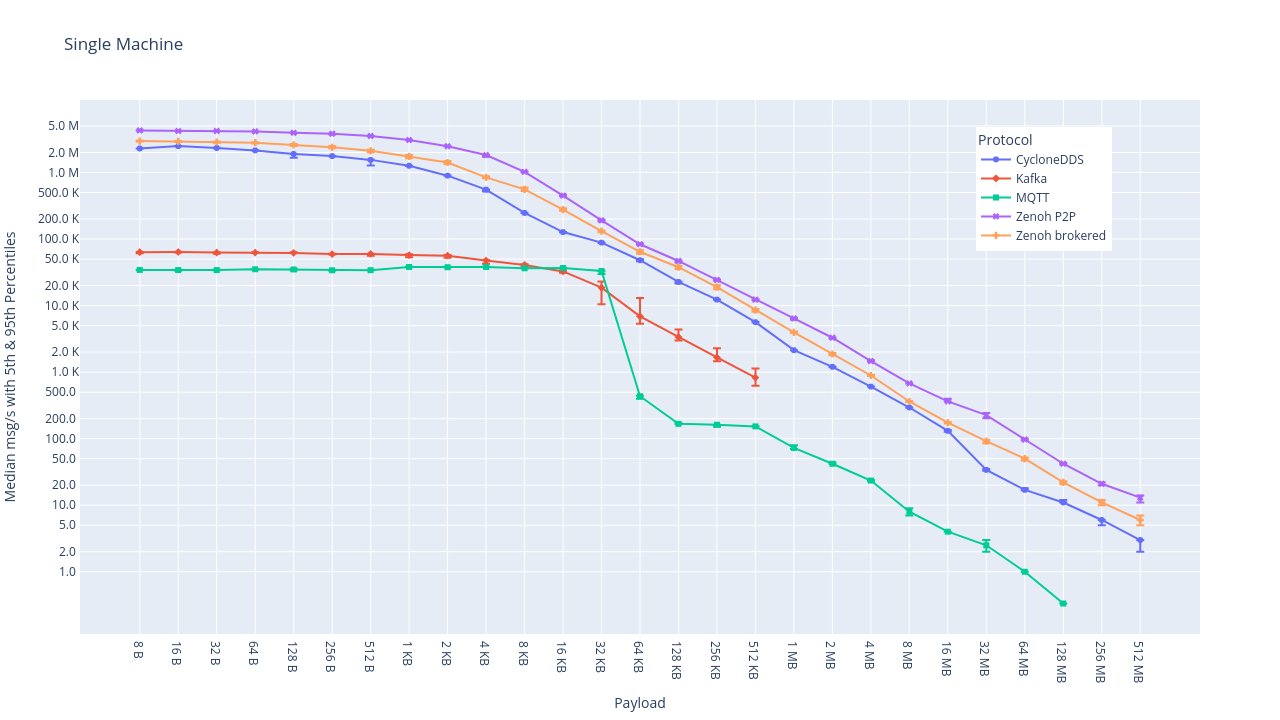
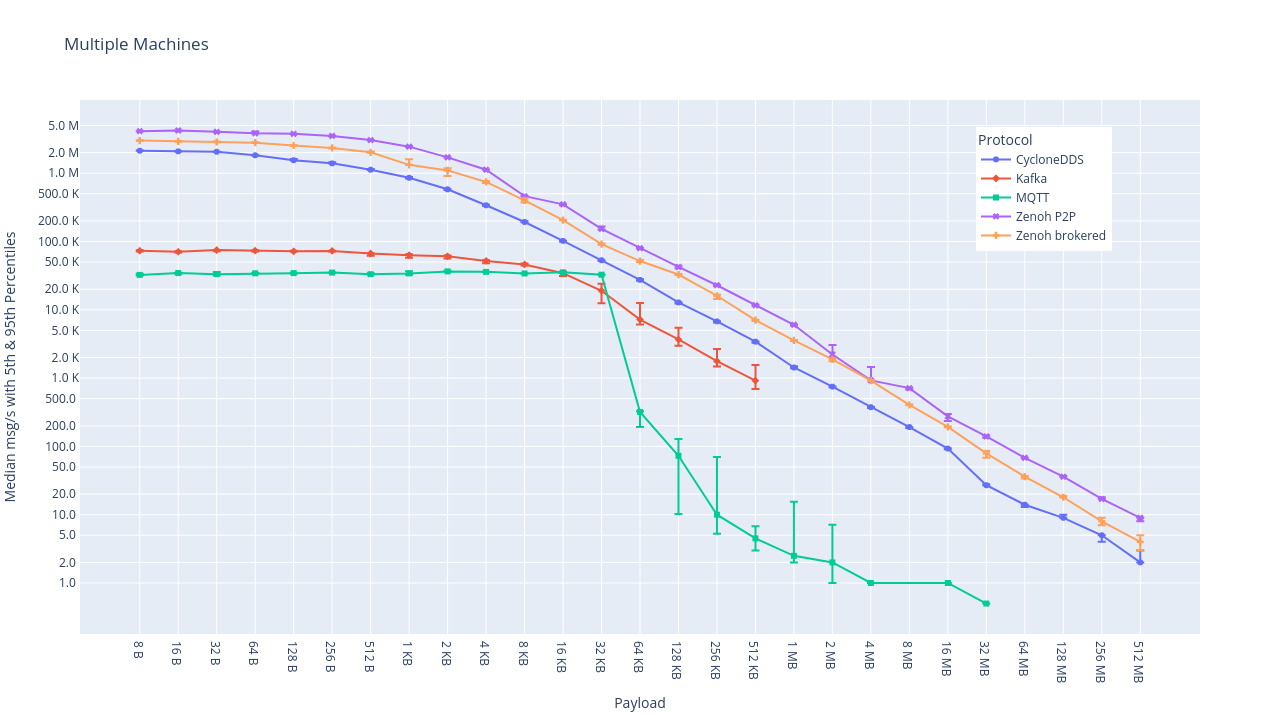
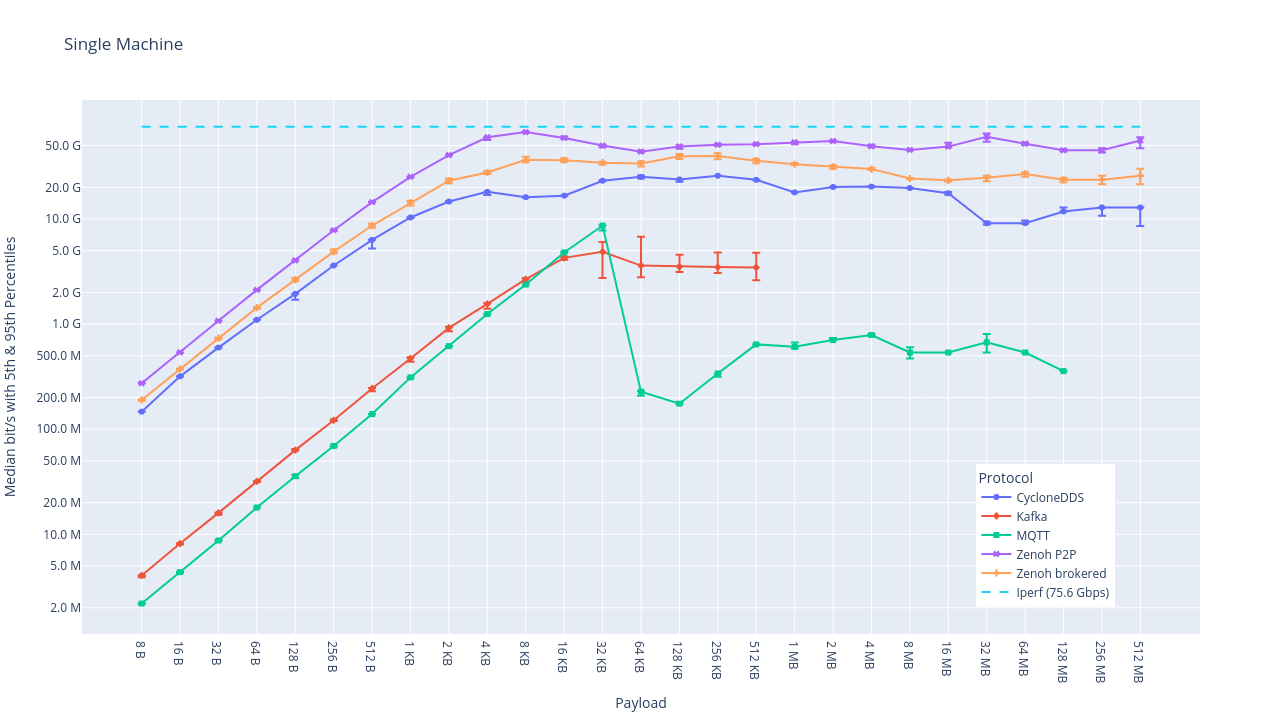
Zenoh Vs MQTT Vs DDS Vs Kafka
Source: Zenoh Blog
Single Machine msg/sec vs payload:
Multiple Machine msg/sec vs payload:
Single Machine bits/sec vs payload:
Multiple Machine bits/sec vs payload:
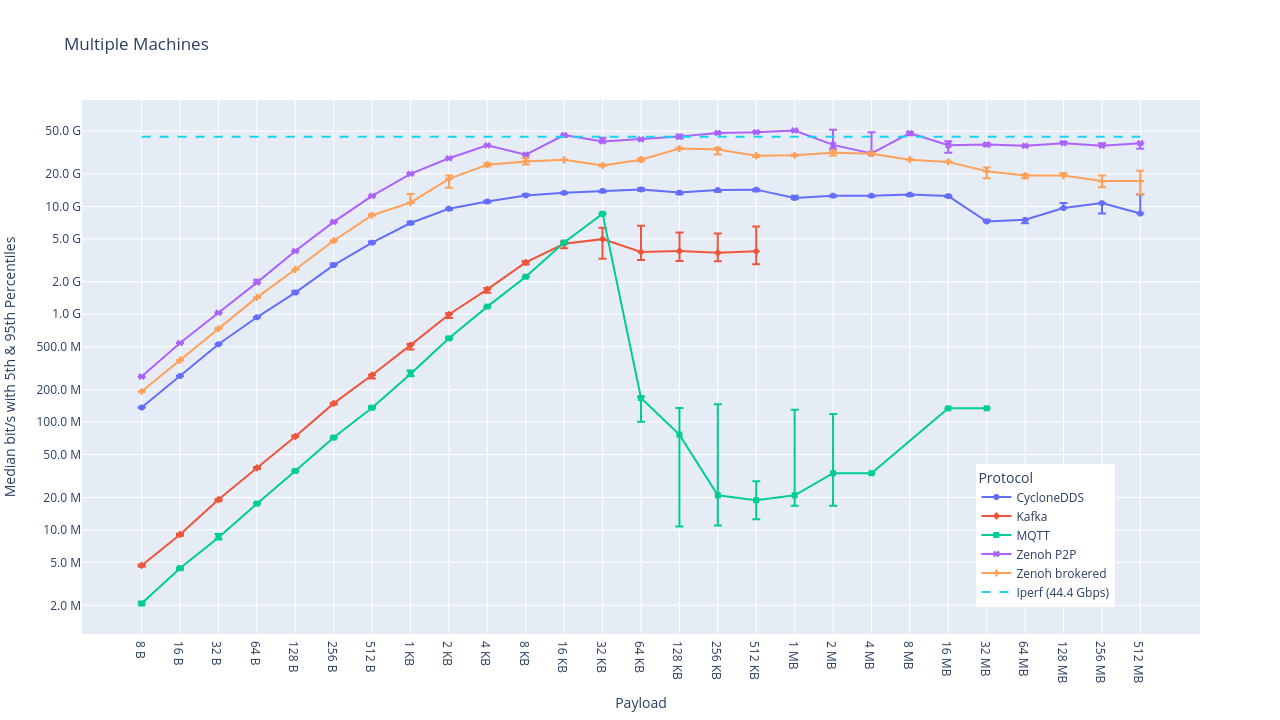
Latency data in µs (microseconds)
| Target | Single-machine | Multiple-machine |
|---|---|---|
| Kafka | 73 | 81 |
| MQTT | 27 | 45 |
| Cyclone DDS | 8 | 37 |
| Zenoh brokered | 21 | 41 |
| Zenoh P2P | 10 | 16 |
| Zenoh-pico | 5 | 13 |
| ping | 1 | 7 |
How To Leverage Python?
MQTT Python
Publisher Code
import paho.mqtt.client as mqtt
import time

def on_connect(client, userdata, flags, rc):
    print("Connected with result code "+str(rc))

def on_publish(client, userdata, mid):
    print("Message Published")

client = mqtt.Client()
client.on_connect = on_connect
client.on_publish = on_publish

client.connect("localhost", 1883, 60) # Replace with your broker address

client.loop_start()  # Start the loop in a separate thread

try:
    while True:
        message = input("Enter message to send: ")
        client.publish("my/topic", message) # Replace with your topic
        time.sleep(1) # Wait for publish confirmation
except KeyboardInterrupt:
    client.loop_stop() # Stop the loop
    client.disconnect() # Disconnect from the broker
    print("Client Disconnected")
Subscriber Code
import paho.mqtt.client as mqtt

def on_connect(client, userdata, flags, rc):
    print("Connected with result code "+str(rc))
    client.subscribe("my/topic") # Subscribe to the topic

def on_message(client, userdata, msg):
    print(msg.topic+" "+str(msg.payload.decode())) # Decode the payload

client = mqtt.Client()
client.on_connect = on_connect
client.on_message = on_message

client.connect("localhost", 1883, 60) # Replace with your broker address

client.loop_forever()
Zenoh
Publisher Code
import zenoh, random, time

random.seed()

def read_temp():
    return random.randint(15, 30)

if __name__ == "__main__":
    with zenoh.open(zenoh.Config()) as session:
        key = 'myhome/kitchen/temp'
        pub = session.declare_publisher(key)
        while True:
            t = read_temp()
            buf = f"{t}"
            print(f"Putting Data ('{key}': '{buf}')...")
            pub.put(buf)
            time.sleep(1)
Subscriber Code
import zenoh, time

def listener(sample):
    print(f"Received {sample.kind} ('{sample.key_expr}': '{sample.payload.to_string()}')")

if __name__ == "__main__":
    with zenoh.open(zenoh.Config()) as session:
        sub = session.declare_subscriber('myhome/kitchen/temp', listener)
        time.sleep(60)
ROS2: Zenoh
Publisher Code
import rclpy
from rclpy.node import Node
from std_msgs.msg import String

import zenoh  # Import zenoh

class Talker(Node):

    def __init__(self):
        super().__init__('talker')
        self.publisher_ = self.create_publisher(String, 'chatter', 10)
        timer_period = 0.5  # seconds
        self.timer = self.create_timer(timer_period, self.timer_callback)
        self.i = 0

        # Initialize Zenoh session (replace with your locator if needed)
        self.zenoh_session = zenoh.open()

    def timer_callback(self):
        msg = String()
        msg.data = 'Hello, Zenoh ROS2! %d' % self.i
        self.publisher_.publish(msg)
        self.get_logger().info('Publishing: "%s"' % msg.data)

        self.zenoh_session.put("ros2/chatter", msg.data.encode())

        self.i += 1

    def __del__(self): # Close Zenoh session on node destruction
        self.zenoh_session.close()

rclpy.init(args=args)
talker = Talker()
rclpy.spin(talker)
talker.destroy_node()
rclpy.shutdown()
Subscriber Code
import rclpy
from rclpy.node import Node
from std_msgs.msg import String

import zenoh

class Listener(Node):

    def __init__(self):
        super().__init__('listener')
        self.subscription = self.create_subscription(
            String,
            'chatter',
            self.listener_callback,
            10)

        # Initialize Zenoh session
        self.zenoh_session = zenoh.open()

        # Zenoh subscriber
        self.zenoh_subscriber = self.zenoh_session.subscribe("ros2/chatter", self.zenoh_callback)

    def listener_callback(self, msg):
        self.get_logger().info('I heard (ROS2): "%s"' % msg.data)

    def zenoh_callback(self, change): # Callback for Zenoh subscription
        if change.kind == zenoh.ChangeKind.Put:
            received_message = change.value.decode('utf-8')  # Decode from bytes
            self.get_logger().info('I heard (Zenoh): "%s"' % received_message)

    def __del__(self):
        self.zenoh_session.close()

rclpy.init(args=args)
listener = Listener()
rclpy.spin(listener)
listener.destroy_node()
rclpy.shutdown()
PyMavlink - Connect Drones/Rover/Submarine using Python
import pymavlink
import time

# Establish a connection to the MAVLink device (replace with your connection string)
# Examples:
#   * Serial:  'udpin:0.0.0.0:14550'  (for UDP)
#   * UDP:      '/dev/ttyS0'          (for serial port)
#   * TCP:      'tcp:192.168.1.1:5760' (for TCP)
try:
    master = pymavlink.mavutil.mavlink_connection('udpin:0.0.0.0:14550') # Replace with your connection string
except Exception as e:
    print(f"Error connecting: {e}")
    exit()

# Wait for a heartbeat message to ensure connection is established
master.wait_heartbeat()
print("Connected to MAVLink device!")

# Request data streams (adjust rates as needed)
master.mav.request_data_stream(master.target_system, master.target_component,
                                   pymavlink.mavutil.mavlink_stream_type.ALL, # Request all streams
                                   10,  # 10 Hz update rate
                                   1)   # Enable streaming

while True:
    try:
        # Receive messages (non-blocking)
        msg = master.recv_match(timeout=0.1)  # 100ms timeout

        if msg:
            if msg.get_type() == 'GLOBAL_POSITION_INT':  # GPS
                lat = msg.lat / 1e7  # Latitude in degrees
                lon = msg.lon / 1e7  # Longitude in degrees
                alt = msg.alt / 1000  # Altitude in meters
                print(f"GPS: Lat={lat}, Lon={lon}, Alt={alt}")

            elif msg.get_type() == 'IMU':  # IMU (raw data)
                xacc = msg.xacc / 1000  # Acceleration in g
                yacc = msg.yacc / 1000
                zacc = msg.zacc / 1000
                xgyro = msg.xgyro / 1000 # Angular rate in rad/s
                ygyro = msg.ygyro / 1000
                zgyro = msg.zgyro / 1000
                print(f"IMU (Raw): Accel=({xacc},{yacc},{zacc})g, Gyro=({xgyro},{ygyro},{zgyro}) rad/s")

            elif msg.get_type() == 'ATTITUDE': # Attitude (Euler angles)
                roll = msg.roll
                pitch = msg.pitch
                yaw = msg.yaw
                print(f"Attitude: Roll={roll}, Pitch={pitch}, Yaw={yaw}")

            # ... other message types as needed (e.g., VFR_HUD, SYS_STATUS)

    except Exception as e:
        print(f"Error receiving or processing message: {e}")
        break  # Exit the loop on error

    time.sleep(0.01)  # Small delay (adjust as needed)

# Close the connection when done (important!)
master.close()
print("Connection closed.")
ROS2 Python Launch File
from launch import LaunchDescription
from launch.actions import DeclareLaunchArgument
from launch.substitutions import LaunchConfiguration
from launch_ros.actions import Node

def generate_launch_description():
    connection_string_arg = DeclareLaunchArgument(
        'connection_string',
        default_value='udpin:0.0.0.0:14550',  # Default connection string
        description='Connection string for MAVLink device'
    )

    zenoh_router_node = Node(
        package='zenoh',
        executable='zenoh-router',
        name='zenoh_router',
        output='screen'
    )

    pymavlink_node = Node(
        package='your_pymavlink_package',  # Replace with your package name
        executable='pymavlink_script.py',  # Replace with your script name
        name='pymavlink_node',
        output='screen',
        parameters=[{
            'connection_string': LaunchConfiguration('connection_string')
        }]
    )

    talker_node = Node(
        package='your_ros2_package',  # Replace with your package name
        executable='talker.py',  # Replace with your script name
        name='talker_node',
        output='screen'
    )

    listener_node = Node(
        package='your_ros2_package',  # Replace with your package name
        executable='listener.py',  # Replace with your script name
        name='listener_node',
        output='screen'
    )

    return LaunchDescription([
        connection_string_arg,
        zenoh_router_node,
        pymavlink_node,
        talker_node,
        listener_node,
    ])
Home Assistance
Awaken your home
Open source home automation that puts local control and privacy first. Powered by a worldwide community of tinkerers and DIY enthusiasts. Perfect to run on a Raspberry Pi or a local server.
Website: https://www.home-assistant.io/
Github: https://github.com/home-assistant/
Server Side Logic
IOT Platforms Vendors
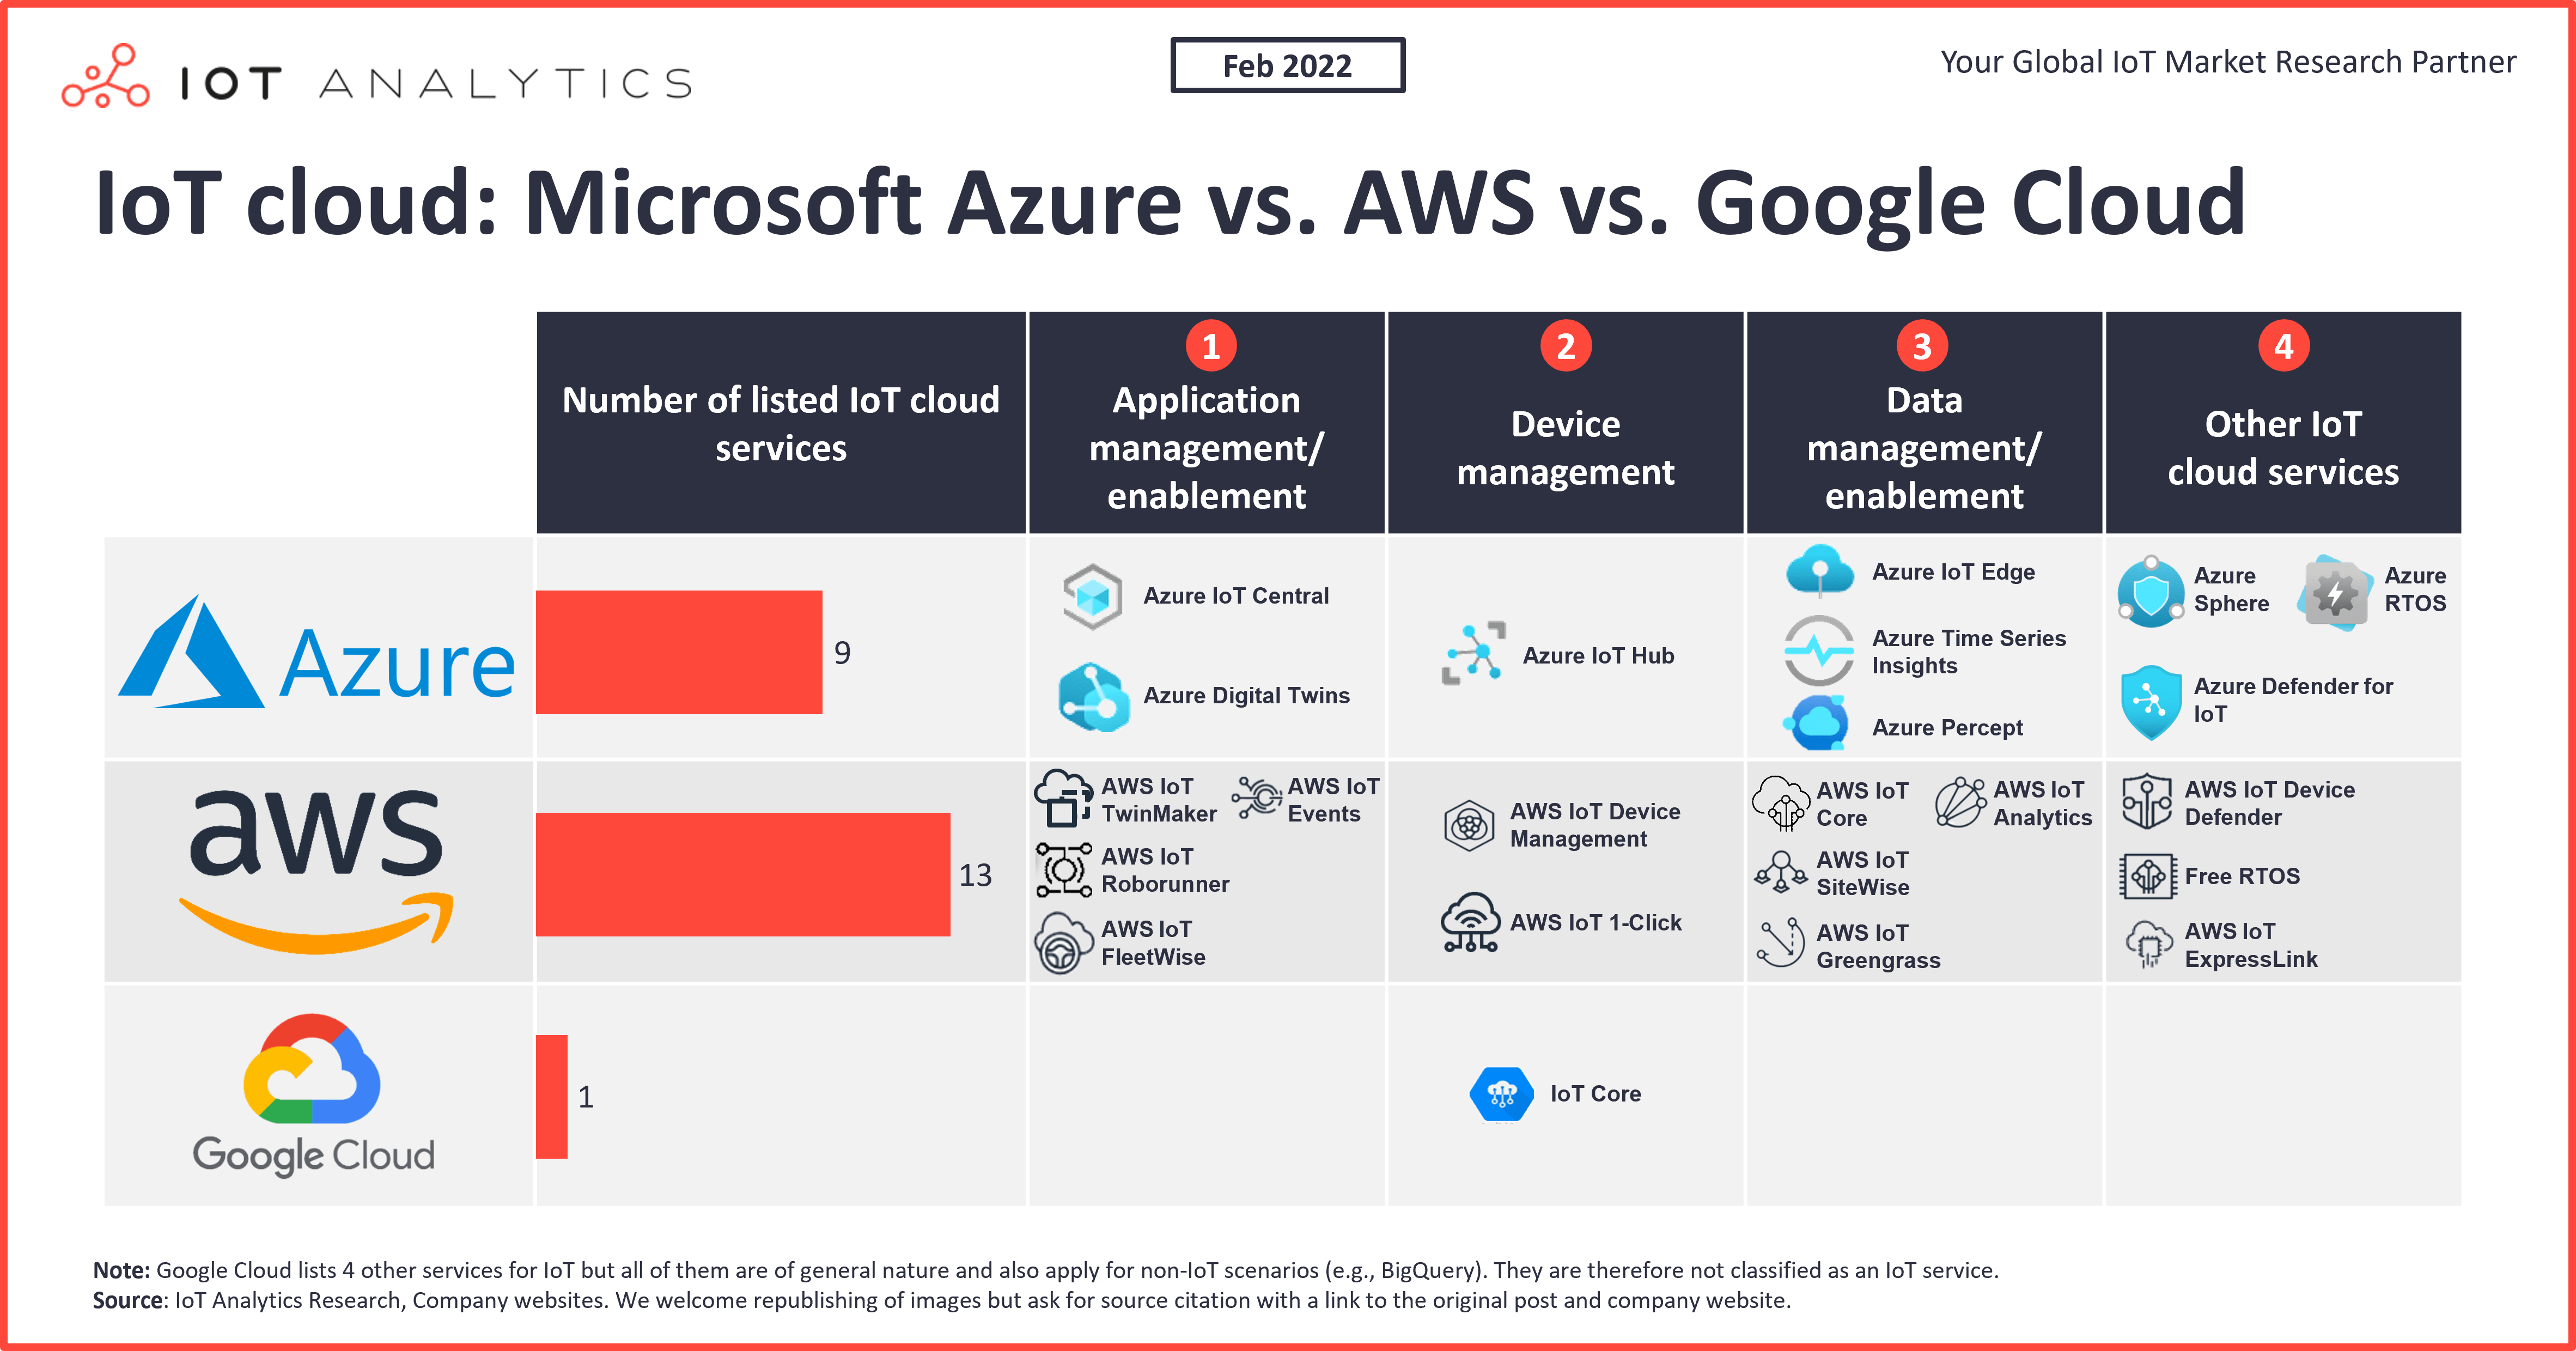
AWS IoT in action

Let’s Make One! But Simpler !!!
Event-Driven Architecture
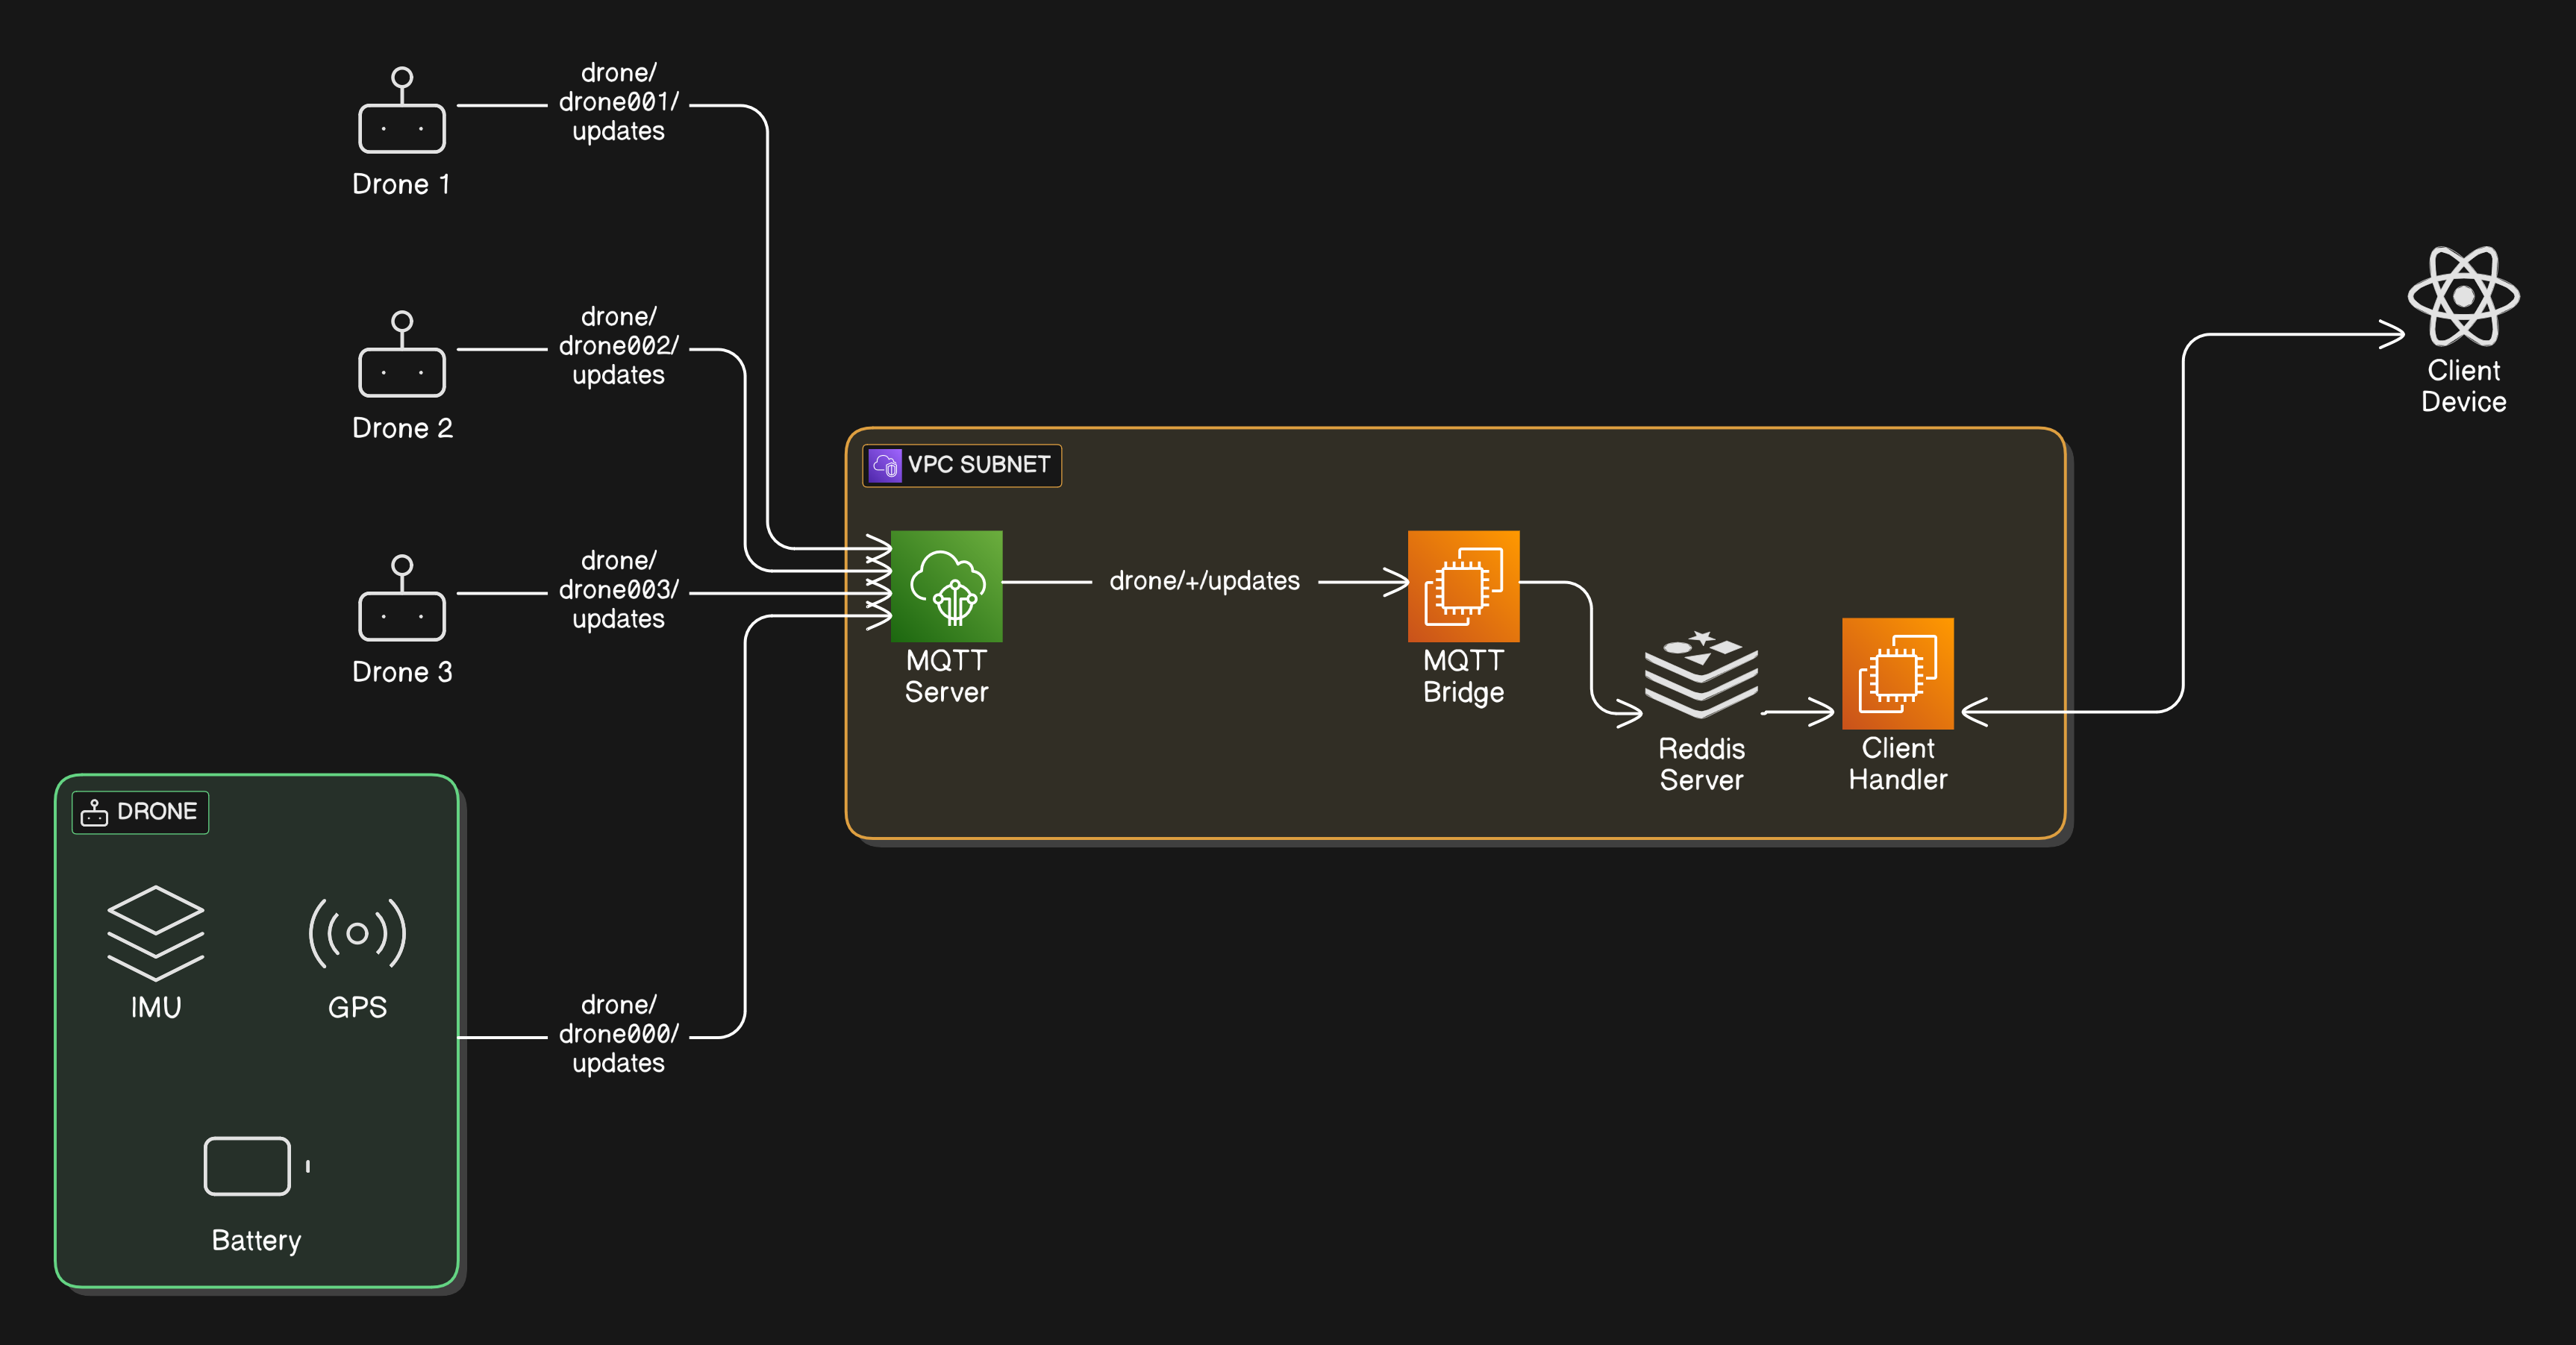
Drone -> Server
import json
import time
import paho.mqtt.client as mqtt
from pymavlink import mavutil

# MQTT settings
BROKER_ADDRESS = "your.mqtt.broker.address"
BROKER_PORT = 1883
USERNAME = "your_username"
PASSWORD = "your_password"
DRONE_ID = "drone001"  # Unique drone identifier
TOPIC = f"drone/{DRONE_ID}/updates"

# Initialize MQTT client with authentication
client = mqtt.Client("mavlink_publisher")
client.username_pw_set(USERNAME, PASSWORD)
client.connect(BROKER_ADDRESS, BROKER_PORT)

# Connect to MAVLink via Serial (adjust the serial port and baud rate as needed)
SERIAL_PORT = "/dev/ttyUSB0"   # e.g., "COM3" for Windows, "/dev/ttyUSB0" for Linux
BAUD_RATE = 57600

mavlink_connection = mavutil.mavlink_connection(SERIAL_PORT, baud=BAUD_RATE)
mavlink_connection.wait_heartbeat()
print("Heartbeat received from the drone via serial connection")

# Initialize drone data including the drone id
drone_data = {
    "drone_id": DRONE_ID,
    "battery": None,
    "gps": {"lat": None, "lon": None}
}

while True:
    msg = mavlink_connection.recv_match(blocking=True, timeout=1)
    if not msg:
        continue

    msg_type = msg.get_type()

    if msg_type == "BATTERY_STATUS":
        drone_data["battery"] = msg.battery_remaining
        print("Updated battery:", drone_data["battery"])

    elif msg_type == "GLOBAL_POSITION_INT":
        drone_data["gps"]["lat"] = msg.lat / 1e7
        drone_data["gps"]["lon"] = msg.lon / 1e7
        print("Updated GPS:", drone_data["gps"])

        # Publish the updated data as a JSON payload
        payload = json.dumps(drone_data)
        client.publish(TOPIC, payload)
        print("Published to topic", TOPIC, ":", payload)

    time.sleep(0.1)
Bridge – Forward MQTT Messages to Redis
import redis
import paho.mqtt.client as mqtt

# MQTT settings
BROKER_ADDRESS = "your.mqtt.broker.address"
BROKER_PORT = 1883
MQTT_TOPIC = "drone/+/updates"  # Wildcard to subscribe to all drone topics
USERNAME = "your_username"
PASSWORD = "your_password"

REDIS_HOST = "localhost"
REDIS_CHANNEL = "_updates"

# Connect to Redis
r = redis.Redis(host=REDIS_HOST, port=6379, db=0)

def on_connect(client, userdata, flags, rc):
    print("Connected to MQTT Broker")
    client.subscribe(MQTT_TOPIC)

def on_message(client, userdata, msg):
    payload = msg.payload.decode()
    print("Received MQTT message on topic", msg.topic, ":", payload)
    # Publish the message to Redis
    drone_str = msg.topic.split("/")[1]
    r.publish(f"{drone_str}{REDIS_CHANNEL}", payload)

mqtt_client = mqtt.Client("mqtt_redis_bridge")
mqtt_client.on_connect = on_connect
mqtt_client.on_message = on_message

mqtt_client.username_pw_set(USERNAME, PASSWORD)
mqtt_client.connect(BROKER_ADDRESS, BROKER_PORT)
mqtt_client.loop_forever()
FastAPI – WebSocket Server Subscribing to Redis
import json
import asyncio
from fastapi import FastAPI, WebSocket, WebSocketDisconnect
import redis.asyncio as aioredis

app = FastAPI()

REDIS_HOST = "localhost"
REDIS_PORT = 6379

# Create an async Redis connection
redis_client = aioredis.Redis(host=REDIS_HOST, port=REDIS_PORT, decode_responses=True)

@app.get("/channels")
async def get_channels():
    """
    GET endpoint to fetch all active drone channels.
    """
    channels = await redis_client.execute_command("PUBSUB", "CHANNELS", "drone*_updates")
    return {"available_channels": channels}

@app.websocket("/ws")
async def websocket_endpoint(websocket: WebSocket):
    await websocket.accept()
    try:
        # Wait for client to send the desired channel name.
        selected_channel = await websocket.receive_text()
        print("Client selected channel:", selected_channel)

        # Create a Redis pubsub subscription to the selected channel.
        pubsub = redis_client.pubsub()
        await pubsub.subscribe(selected_channel)

        try:
            while True:
                # Poll for new messages with a short timeout.
                message = await pubsub.get_message(ignore_subscribe_messages=True, timeout=1.0)
                if message:
                    data = message["data"]
                    await websocket.send_text(data)
                await asyncio.sleep(0.01)
        except Exception as e:
            print("Error in Redis listener:", e)
        finally:
            await pubsub.unsubscribe(selected_channel)
            await pubsub.close()
    except WebSocketDisconnect:
        print("WebSocket disconnected")
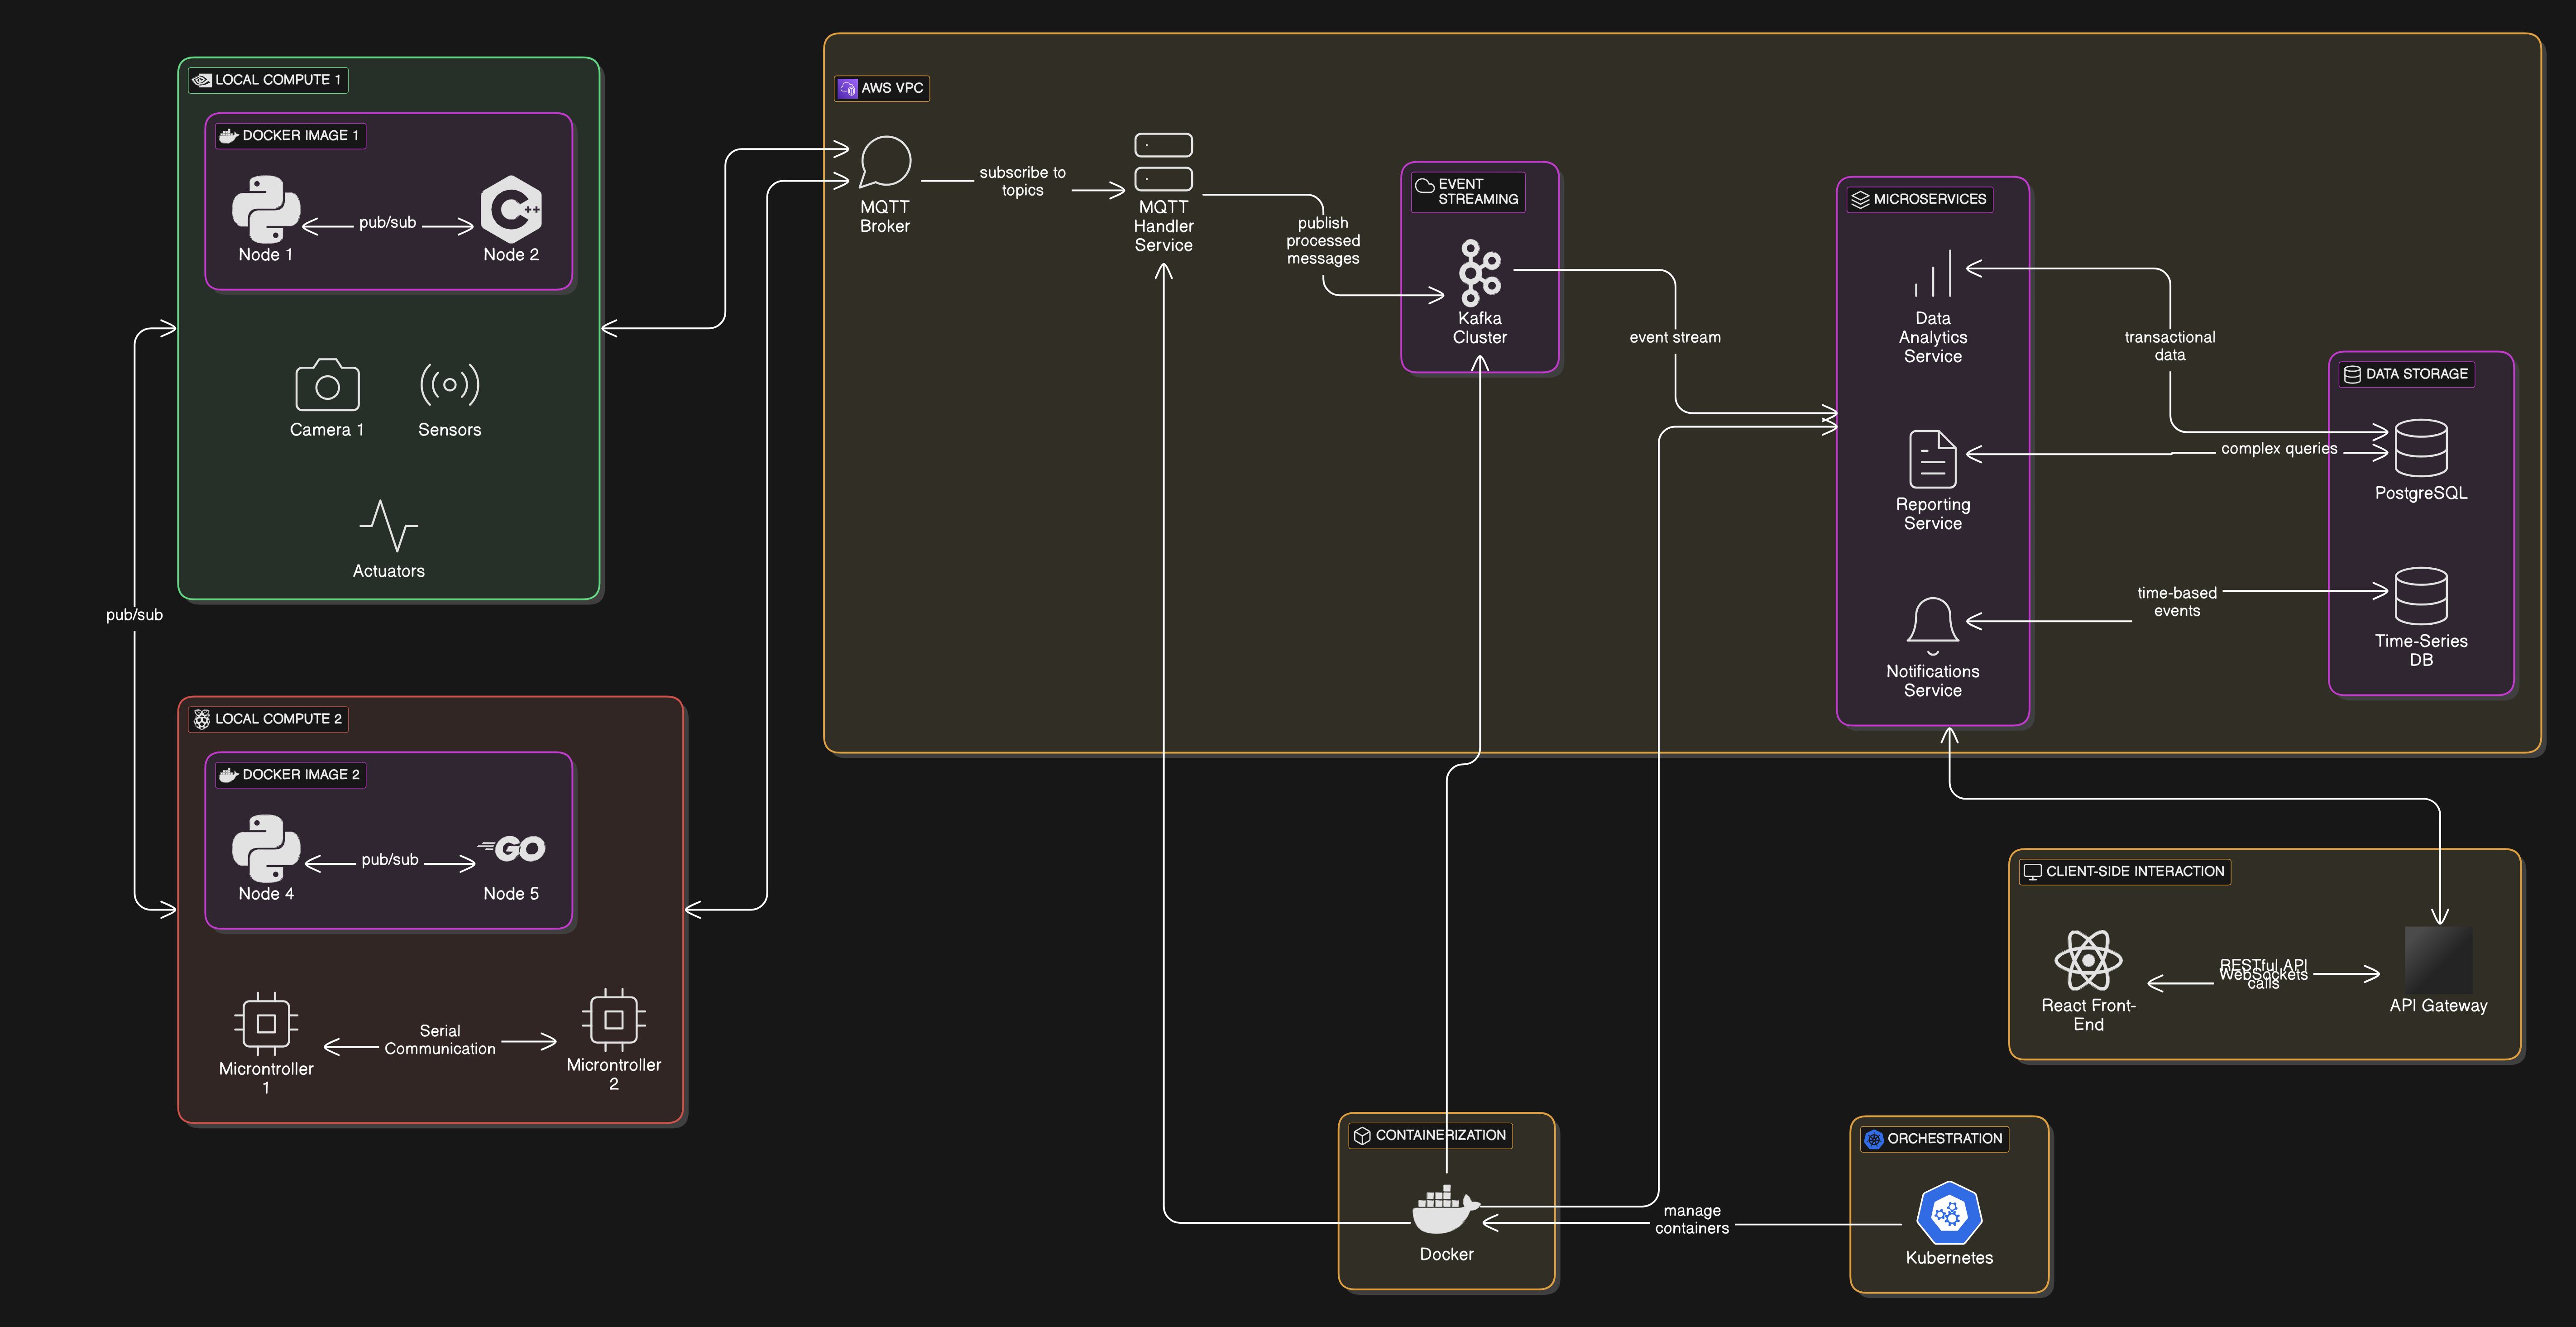
Distributed Databases
Use a combination of:
- Time-Series Databases (InfluxDB/TimescaleDB) – For sensor logs.
- Graph Databases (Neo4j) – For robot-network relationships.
- Outcome: Faster queries, optimized storage.
Microservices & Kubernetes
Monolithic backends fail when robots scale.
Solution:
- Split services into microservices:
- Command Service – Handles control requests.
- Telemetry Service – Manages sensor data.
- Analytics Service – Runs AI-based optimizations.
- Use Kubernetes for auto-scaling.
Summary


Comments