8 min to read
Build Text Editor Using Python
Use PyQt to create your own text editor

Build Text Editor Using Python
Introduction
Throughout your career or daily life, you’ve likely used various text editors—but have you ever thought about creating one yourself? If the answer is yes, then you’re in the right place! Let’s dive in and explore the process of building a text editor from scratch using Python, learning valuable programming concepts along the way.
This application was created for PyCon 2023 India Young Learner’s Workshop: Link
Video Tutorial
Github Link: https://github.com/bytesByHarsh/youtubeProjects/tree/master/PyQt/pythonTextEditor
Setup Commands
sudo apt update
sudo apt upgrade
sudo apt install git
sudo apt install gnome-terminal

pip install pyqt5
Initial UI Screens
We will be using Qt Designer to create our UI of Text Editor. This UI file can be directly imported into Python. Now there are several ways of doing it you can refer to this post or you can checkout the following video:
Basic Python Code Integration
We will now start importing the UI file into our main code that can be done using:
from PyQt5.QtWidgets import QApplication, QMainWindow, QWidget, QVBoxLayout, QFileDialog
from PyQt5.QtWidgets import QAction, QTreeWidget, QPushButton, QTreeWidgetItem, QMessageBox, QLabel
from PyQt5.QtCore import QUrl, Qt
from PyQt5.QtGui import QIcon, QDesktopServices
from PyQt5 import uic  # Import the uic module

class PythonTextEditor(QMainWindow):
    def __init__(self):
        super().__init__()
        self.initUI()
    def initUI(self):
        uic.loadUi("ui/editor.ui", self)
        self.setWindowTitle("Python Text Editor in Python")
        self.show()

if __name__ == '__main__':
    try:
        app = QApplication(sys.argv)
        editor = PythonTextEditor()
        sys.exit(app.exec_())
    except KeyboardInterrupt:
        print("Got Keyboard Interrupt")
        exit(0)
This should be able to load the UI File.
Text Editor Class
We also require a separate class for text editor where user can actually write the code. We can make use of following code:
from PyQt5.QtGui import QTextCursor, QTextCharFormat, QSyntaxHighlighter, QFont
from PyQt5.QtWidgets import QPlainTextEdit, QTextEdit, QWidget, QVBoxLayout, QPushButton, QApplication
from PyQt5.QtCore import Qt, QRegExp

class PythonCodeEditor(QPlainTextEdit):
    def __init__(self):
        super().__init__()

        self.setTabStopWidth(20)
        self.setTabChangesFocus(False)

        self.zoom_level = 5

    def text(self):
        return self.toPlainText()

    def textZoomIn(self):
        self.zoom_level *= 2
        self.zoom_level = min(self.zoom_level, 20)
        self.zoomIn(self.zoom_level)

    def textZoomOut(self):
        self.zoom_level /= 2
        self.zoom_level = max(self.zoom_level, 2)
        self.zoomOut(self.zoom_level)

if __name__ == "__main__":
    app = QApplication([])
    editor = PythonCodeEditor()
    editor.show()
    app.exec_()
This file: codeEditor.py can be run independently as well and will just present a single QWidget Text Box to write the code/text.
Text Highlighting in Text Editor
Now a text editor is incomplete without cod ehighlighting for important words, now we can create one more class responsible for highlighting the pre-defined keywords.
class PythonSyntaxHighlighter(QSyntaxHighlighter):
    def __init__(self, document):
        super().__init__(document)

        self.highlighting_rules = []

        #Create rules to highlight different elements
        keyword_format = QTextCharFormat()
        keyword_format.setForeground(Qt.blue)
        keyword_format.setFontWeight(QFont.Bold)
        keywords = ["False","None","True","and","as","assert","break",
                    "class","continue","def","del","elif","else","except",
                    "finally","for","from","global","if","import","in","is",
                    "lambda","nonlocal","not","or","pass","raise","return",
                    "try","while","with","yield"]  # Add more as needed
        for keyword in keywords:
            rule = (r'\b' + keyword + r'\b', keyword_format)
            self.highlighting_rules.append(rule)

        # Create a rule for strings (in double or single quotes)
        string_format = QTextCharFormat()
        string_format.setForeground(Qt.darkGreen)
        self.highlighting_rules.append((r'\".*\"', string_format))
        self.highlighting_rules.append((r'\'.*\'', string_format))
        self.highlighting_rules.append((r'#.*$', string_format))

        triple_double_quoted_format = QTextCharFormat()
        triple_double_quoted_format.setForeground(Qt.red)
        self.highlighting_rules.append((r'""".*?"""', triple_double_quoted_format))

    def highlightBlock(self, text) -> None:
        for pattern, format in self.highlighting_rules:
            expression = QRegExp(pattern)
            index = expression.indexIn(text)

            while index >= 0:
                length = expression.matchedLength()
                self.setFormat(index, length, format)
                index = expression.indexIn(text, index + length)
Now you can add more keywords and rules according to your own preference.
In order to use it you need to modify the code:
class PythonCodeEditor(QPlainTextEdit):
    def __init__(self):
        super().__init__()

        self.setTabStopWidth(20)
        self.setTabChangesFocus(False)

        self.highlighter = PythonSyntaxHighlighter(self.document())

        self.zoom_level = 5
Rest of the code will remain as it is.
Integration of Text Editor and Main UI
from codeEditor import PythonCodeEditor

class PythonTextEditor(QMainWindow):
    def __init__(self):
        super().__init__()
        self.initUI()

    def initUI(self):
        uic.loadUi("ui/editor.ui", self)
        self.setWindowTitle("Python Text Editor in Python")

        ## Declare all the buttons and options data type
        ## Helps in writing the code bcz of autosuggestion

        self.codeLayout:QVBoxLayout
        self.runButton:QPushButton
        self.fileDirTreeWidget:QTreeWidget
        self.zoomInButton:QPushButton
        self.zoomOutButton:QPushButton
        self.fileNameLabel:QLabel

        self.actionOpen:QAction
        self.actionSave:QAction


        self.pythonCodeEditor: QWidget = PythonCodeEditor()
        self.codeLayout.addWidget(self.pythonCodeEditor)


        self.runButton.clicked.connect(self.runPythonCode)
        self.fileDirTreeWidget.itemDoubleClicked.connect(self.openSelectedFile)
        self.zoomInButton.clicked.connect(self.textZoomIn)
        self.zoomOutButton.clicked.connect(self.textZoomOut)

        ## Actions
        self.actionOpen.triggered.connect(self.open_file)
        self.actionSave.triggered.connect(self.save_file)

        self.actionOpen.setShortcut("Ctrl+O")
        self.actionSave.setShortcut("Ctrl+S")


        self.show()
By doing so we have add text editor in our UI.
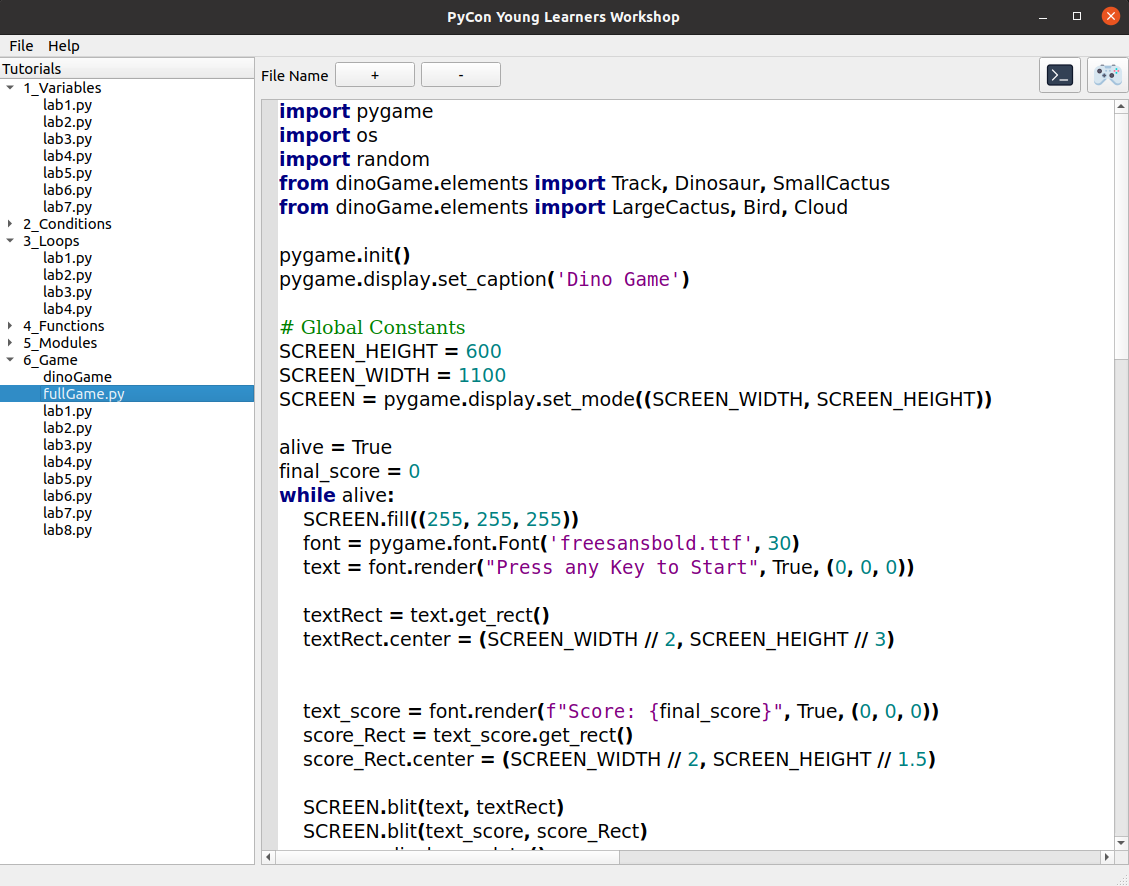
Result

Hope you enjoyed this tutorial, make sure you follow me for more such content. Do checkout Github Link for complete code.


Comments